I've been playing around with XNA these past few nights and decided to write a few casual games. The first prototype I have is a port of my old Puzzle Game. The game is still really incomplete, like there is no menu or state management which means you can't shut it down properly and stuff. But I thought I'd share some thoughts on my experience with it and at the same time share some code.
The structure of the game is fairly simple. I have 2 collections: one contains an image, another contains an index to the each of the elements of the first collection and its the area where to display the image on the screen. The collection that contains the indexes is my scrambled puzzle. Each time a piece is moved, I update the order of my scrambled list afterwards I check if all the items in my scrambled list are correctly sorted in an ascending fashion. If all the items are sorted properly then it means that the puzzle was solved.
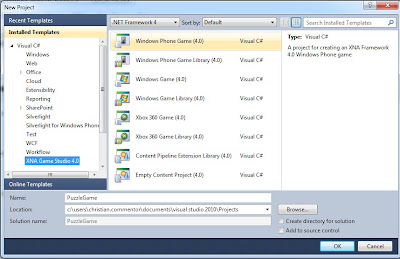
Enough said and let's get started. The first step is to of course fire up Visual Studio and create a new XNA Game Studio 4.0 - Windows Phone Game project. Let's call the project PuzzleGame
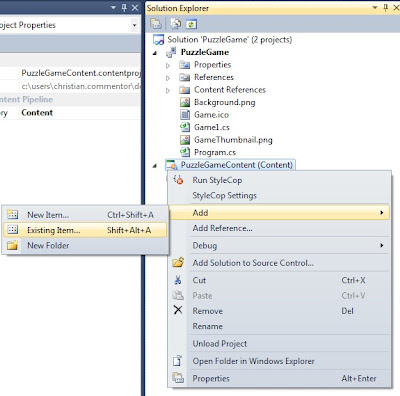
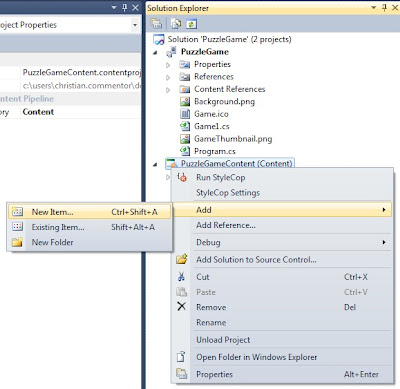
Now that we have a project we can start adding some content or game assets. For this simple project, we will use 3 different game assets: the puzzle image, and 2 Sprite Font for drawing the elapsed playing time and to draw text to congratulate the player once they complete the puzzle. To add content, right click on the PuzzleGameContent project, then click on Add.
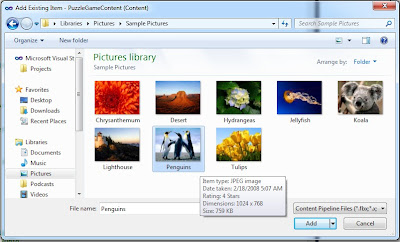
For the puzzle image, we can pick up one of the sample pictures included in Windows 7 (e.g. \Users\Public\Pictures\Sample Pictures)
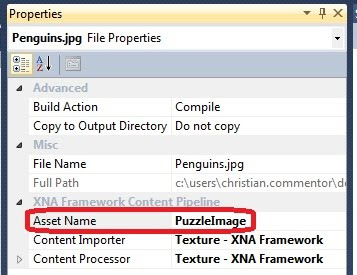
After adding the puzzle image we should change the Asset Name property to PuzzleImage. This can be done through the Properties Window (Right click on the added image in the Solution Explorer and click Properties)
To add Sprite Fonts, right click on the content project, click Add - New Item, then select Sprite Font. Let's add 2 sprite fonts and call them GameTime and Congratulations
Let's change the Asset Name of the Sprite Fonts we just added to GameTimeFont and CongratulationsFont
The SpriteFont content is actually just an XML file. The GameTime font's default description should be good enough but let's change the Congratulations font description to use a larger size. Open Congratulations.spritefont from the solution explorer and change the Size to 48, and change the Style to Bold
Now that we have our game assets in place we can start coding. A lot of initial code is generated when creating a new XNA Game Studio project. To start things clean let's rename default Game1 class to PuzzleGame and delete all the contents leaving the PuzzleGame class empty.
Before we start implementing our PuzzleGame class we'll need to create a class which will represent a piece of the puzzle, let's call this PuzzlePiece
class PuzzlePiece
{public int Index { get; set; }
public Vector2 Bounds { get; set; }
public override int GetHashCode()
{ return Index.GetHashCode();}
public override bool Equals(object obj)
{var piece = obj as PuzzlePiece;
if (piece != null)
return Index.Equals(piece.Index);return base.Equals(obj);
}
}
We'll also need an enumeration that describes the state of the game. This state describes what to draw on the screen. Let's call this enum DrawMode. There are 2 simple states of the game:
1. Puzzle - Draws the puzzle game
2. Congratulations - Draws a "Congratulations" text once the player solves the puzzle
enum DrawMode
{Puzzle,
Congratulations
}
Now we can start implementing our PuzzleGame class. The first step is to define our global variables and the constructor method
GraphicsDeviceManager graphics;SpriteBatch spriteBatch;Texture2D previewTexture;Vector2 previewVector, emptyPiece, totalGameTimeVector, congratulationsVector;SpriteFont gameTimerFont,congratulationsFont;Dictionary<int, Texture2D> puzzlePieces;
Dictionary<int, PuzzlePiece> scrambledPieces;
DrawMode Mode;int height, width;double elapsedTime, playingTime;Queue<Keys> pendingCommands;
const int PIECE_COUNT = 4 * 4;
bool solved;static bool animating;
public PuzzleGame(){graphics = new GraphicsDeviceManager(this);
Content.RootDirectory = "Content";}
Next step is to implement the Initialize() method. This method allows the game to perform any initialization it needs before it starts to run. With a simple game such as this one could debate where to put the initialization code, I could easily see myself having my initialize code in the constructor method. To make this example as XNA'ish let's initialize our non-content variables in the Initialize() method.
/// <summary>
/// Allows the game to perform any initialization it needs to before starting to run.
/// This is where it can query for any required services and load any non-graphic
/// related content. Calling base.Initialize will enumerate through any components
/// and initialize them as well.
/// </summary>
protected override void Initialize()
{pendingCommands = new Queue<Keys>();
Mode = DrawMode.Puzzle;previewVector = new Vector2(0, 0);
totalGameTimeVector = new Vector2(10, 10);
base.Initialize();}
Next we implement the LoadContent() and UnloadContent()
/// <summary>
/// LoadContent will be called once per game and is the place to load
/// all of your content.
/// </summary>
protected override void LoadContent()
{spriteBatch = new SpriteBatch(GraphicsDevice);
previewTexture = Content.Load<Texture2D>("PuzzleImage");
gameTimerFont = Content.Load<SpriteFont>("GameTimeFont");
congratulationsFont = Content.Load<SpriteFont>("CongratulationsFont");
var size = congratulationsFont.MeasureString("Congrautulations!");
congratulationsVector = new Vector2(
(GraphicsDevice.Viewport.Width - size.X) / 2,
(GraphicsDevice.Viewport.Height - size.Y) / 2);
Divide();
Scramble();
}
/// <summary>
/// UnloadContent will be called once per game and is the place to unload
/// all content.
/// </summary>
protected override void UnloadContent()
{previewTexture.Dispose();
foreach (var item in puzzlePieces)
item.Value.Dispose();
spriteBatch.Dispose();
}
You probably noticed that LoadContent calls methods called Divide() and Scramble().
The Divide() method splits the puzzle image into tiny pieces represented by the PuzzlePiece class. The full puzzle image is stored in a Texture2D object called previewTexture, to split this into pieces I copy the color information of the puzzle image within a specified bounds into an array of type Color and then I set this color information in a new instance of Texture2D.
private void Divide()
{ int idx = 0;int cells = Convert.ToInt32(Math.Sqrt(PIECE_COUNT));
height = GraphicsDevice.Viewport.Height / cells;
width = GraphicsDevice.Viewport.Width / cells;
puzzlePieces = new Dictionary<int, Texture2D>();
for (int y = 0; y < GraphicsDevice.Viewport.Height; y += height)
{for (int x = 0; x < GraphicsDevice.Viewport.Width; x += width)
{var rectangle = new Rectangle(x, y, width, height);
var data = new Color[width * height];
previewTexture.GetData<Color>(0, rectangle, data, 0, data.Length);var piece = new Texture2D(GraphicsDevice, width, height);
piece.SetData(data);
puzzlePieces.Add(idx++, piece);
}
}
}
The Scramble() method does exactly what the method name describes, it scrambles the puzzle. The field called scrambledPieces is a key/value pair collection that uses the index of the puzzlePieces collection as the key and the bounds of this image to be drawn on the screen as the value. The bounds of the image is stored in a Vector2 object.
private void Scramble()
{ int idx = 0;var random = new Random();
int capacity = puzzlePieces.Count - 1;scrambledPieces = new Dictionary<int, PuzzlePiece>(puzzlePieces.Count);
for (int y = 0; y < GraphicsDevice.Viewport.Height; y += height)
{for (int x = 0; x < GraphicsDevice.Viewport.Width; x += width)
{ if (idx < capacity) {var piece = new PuzzlePiece();
while (true)
{piece.Index = random.Next(0, capacity);
if (!scrambledPieces.ContainsValue(piece)) break;}
piece.Bounds = new Vector2(x, y);
scrambledPieces.Add(idx++, piece);
}
elseemptyPiece = new Vector2(x, y);
}
}
scrambledPieces.Add(idx, new PuzzlePiece { Index = -1 });
}
All we need now is to implement the Game Loop.
The Update() method will contain the game logic. The game logic will be used for updating the game surface, collision detection, accepting and handling user input, background music, sounds effects, etc. In our game we use it for accepting and handling user input. We accept the user input through polling the Mouse state by calling the static method Mouse.GetState(). We handle the user input by doing a hit test to get which puzzle piece was clicked and moving this piece. Only one piece can be moved at a time and this piece can only move up, down, left, or right. For those who are not familiar with what a hit test is, here's my attempt to define it: A hit test is a way of detecting if 2 objects are touching or intersecting with each other. In our case, we use hit testing to figure out which puzzle piece was clicked by checking all the pieces of the puzzle if the mouse position is inside its bounds. Moving a puzzle piece is implemented as a very basic animation that runs on a separate thread. User input is not handled while the puzzle pieces are being moved around. The update method also updates the game playing time which we later on draw on the screen.
/// <summary>
/// Allows the game to run logic such as updating the world,
/// checking for collisions, gathering input, and playing audio.
/// </summary>
/// <param name="gameTime">Provides a snapshot of timing values.</param>
protected override void Update(GameTime gameTime)
{var mouseState = Mouse.GetState();
if (mouseState.LeftButton == ButtonState.Pressed)
{ if (animating) { base.Update(gameTime); return;}
var clickedRectangle = new Rectangle(mouseState.X, mouseState.Y, width, height);
var pieceRect = new Rectangle(0, 0, width, height);
for (int i = 0; i < scrambledPieces.Count; i++)
{ pieceRect.X = (int)scrambledPieces[i].Bounds.X; pieceRect.Y = (int)scrambledPieces[i].Bounds.Y; if (!pieceRect.Intersects(clickedRectangle)) continue; if (mouseState.X >= emptyPiece.X &&mouseState.X <= emptyPiece.X + width &&
mouseState.Y >= emptyPiece.Y &&
mouseState.Y <= emptyPiece.Y + height)
continue;Keys command = Keys.None;
if (pieceRect.X >= emptyPiece.X && pieceRect.X <= emptyPiece.X) { if (pieceRect.Y - height == emptyPiece.Y) command = Keys.Up;else if (pieceRect.Y + height == emptyPiece.Y)
command = Keys.Down;}
else if (pieceRect.Y >= emptyPiece.Y && pieceRect.Y <= emptyPiece.Y)
{ if (pieceRect.X - width == emptyPiece.X) command = Keys.Left;else if (pieceRect.X + width == emptyPiece.X)
command = Keys.Right;}
if (command != Keys.None && !pendingCommands.Contains(command))
{pendingCommands.Enqueue(command);
Debug.WriteLine("Clicked: " + i);
}
break;}
}
elseelapsedTime += gameTime.ElapsedGameTime.TotalMilliseconds;
if (elapsedTime >= 10) { if (pendingCommands.Count > 0)MovePiece(pendingCommands.Dequeue());
elapsedTime = 0;
}
if (!solved)playingTime += gameTime.ElapsedGameTime.TotalMilliseconds;
base.Update(gameTime);}
The MovePiece() method does a hit test to find which piece to move. Once the correct piece is found the Animate() method is called.
private void MovePiece(Keys command)
{for (int i = 0; i < scrambledPieces.Count; i++)
{ switch (command) {case Keys.Up:
if (scrambledPieces[i].Bounds.X == emptyPiece.X && scrambledPieces[i].Bounds.Y - height == emptyPiece.Y) {Animate(command, i);
return;}
break;case Keys.Down:
if (scrambledPieces[i].Bounds.X == emptyPiece.X && scrambledPieces[i].Bounds.Y + height == emptyPiece.Y) {Animate(command, i);
return;}
break;case Keys.Left:
if (scrambledPieces[i].Bounds.Y == emptyPiece.Y && scrambledPieces[i].Bounds.X - width == emptyPiece.X) {Animate(command, i);
return;}
break;case Keys.Right:
if (scrambledPieces[i].Bounds.Y == emptyPiece.Y && scrambledPieces[i].Bounds.X + width == emptyPiece.X) {Animate(command, i);
return;}
break;}
}
}
The Animate() method starts a thread in the ThreadPool which will move the puzzle piece by 2 pixels at a time until the piece is placed in the empty area. The empty area information is stored in the emptyPiece object. Once the piece is in the empty area the scrambled index of the piece is updated together with its new bounds. Finally a check if the puzzle was solved by the move is done.
private void Animate(Keys direction, int i)
{ animating = true; ThreadPool.QueueUserWorkItem((state) => { try {const int INCREMENT = 2;
var newEmptyPiece = scrambledPieces[i].Bounds; while (scrambledPieces[i].Bounds != emptyPiece) { switch (direction) {case Keys.Up:
scrambledPieces[i].Bounds = new Vector2(emptyPiece.X, scrambledPieces[i].Bounds.Y - INCREMENT);
break;case Keys.Down:
scrambledPieces[i].Bounds = new Vector2(emptyPiece.X, scrambledPieces[i].Bounds.Y + INCREMENT);
break;case Keys.Left:
scrambledPieces[i].Bounds = new Vector2(scrambledPieces[i].Bounds.X - INCREMENT, emptyPiece.Y);
break;case Keys.Right:
scrambledPieces[i].Bounds = new Vector2(scrambledPieces[i].Bounds.X + INCREMENT, emptyPiece.Y);
break;}
Thread.Sleep(1);}
emptyPiece = newEmptyPiece;
}
finally {UpdateScrambledIndex(direction, i);
CheckForCompletion();
animating = false;}
});
}
private void UpdateScrambledIndex(Keys command, int index)
{ int newIndex = -1;int INCREMENT = Convert.ToInt32(Math.Sqrt(PIECE_COUNT));
switch (command) {case Keys.Up:
newIndex = index - INCREMENT;
if (newIndex < 0) newIndex = 0; break;case Keys.Down:
newIndex = index + INCREMENT;
if (newIndex > scrambledPieces.Count - 1) newIndex = scrambledPieces.Count - 1; break;case Keys.Left:
newIndex = index - 1;
if (newIndex < 0) newIndex = 0; break;case Keys.Right:
newIndex = index + 1;
if (newIndex > scrambledPieces.Count - 1) newIndex = scrambledPieces.Count - 1; break;}
var temp = scrambledPieces[newIndex];scrambledPieces[newIndex] = scrambledPieces[index];
scrambledPieces[index] = temp;
}
private void CheckForCompletion()
{for (int i = 0; i < scrambledPieces.Count - 1; i++)
if (scrambledPieces[i].Index != i) return; solved = true; Mode = DrawMode.Congratulations;}
Last but not the least we implement the Draw() method. This is where we render the screen. We always start by clearing the screen and afterwards adding sprites to our SpriteBatch. In our game we only have 2 ways of rendering the screen: rendering the puzzle game in play; and rendering if the puzzle was solved.
To render the puzzle game I add a sprite that draws the game playing time on the top left corner then I add a sprite for each piece of the puzzle by iterating through my scrambledPieces collection..
To render the screen when the puzzle is solved I draw 2 sprites. One is the playing time and the other is "Congratulations"
/// <summary>
/// This is called when the game should draw itself.
/// </summary>
/// <param name="gameTime">Provides a snapshot of timing values.</param>
protected override void Draw(GameTime gameTime)
{ GraphicsDevice.Clear(Color.Black);spriteBatch.Begin(SpriteSortMode.BackToFront, BlendState.AlphaBlend);
switch (Mode) {case DrawMode.Puzzle:
spriteBatch.DrawString(gameTimerFont, new TimeSpan(0, 0, 0, 0, (int)playingTime).ToString(), totalGameTimeVector, Color.White);
for (int i = 0; i < scrambledPieces.Count; i++)
{if (scrambledPieces[i].Index == -1) continue;
var piece = puzzlePieces[scrambledPieces[i].Index]; spriteBatch.Draw(piece, scrambledPieces[i].Bounds, Color.White);}
break;case DrawMode.Congratulations:
spriteBatch.DrawString(gameTimerFont, new TimeSpan(0, 0, 0, 0, (int)playingTime).ToString(), totalGameTimeVector, Color.White);
spriteBatch.DrawString(congratulationsFont, "Congratulations!", congratulationsVector, Color.White);
break;}
spriteBatch.End();
base.Draw(gameTime);}
I hope you found this article useful and educational. You can grab the source code here


2 comments:
Thanks for the great introduction to this. Still waiting on WP7 to be available in my area. If I had one I'd check out your published game.
There does seem to be some flaws to the code in the sample. The only real issue I've seen and not yet tried to look into too closely is that sometimes the game will congratulate me when the puzzle is not close to correctly completed.
I also don't quite understand the lines that use logic like "pieceRect.X >= emptyPiece.X && pieceRect.X <= emptyPiece.X"
It would seem this is basically stating if (pieceRect.X == emptyPiece.X) since I can't think of a scenario where it could be both > and <
The code:
"pieceRect.X >= emptyPiece.X && pieceRect.X <= emptyPiece.X"
Checks if the player pressed anywhere within the bounds of the movable puzzle piece
Post a Comment