Thursday, November 11, 2010

How to enable Internet Tethering on a Samsung Omnia 7

I recently received a Samsung Omnia 7 and I think it's a pretty awesome phone. But, Windows Phone 7 in general lags behind with a few things, one of these things is a built in internet tethering feature (like in the iPhone for example). Since I'm going away for a few days I don't intend on going around with a 3G modem (my laptop doesn't have a built in 3G modem), neither am I to keen on switching back to my iPhone. So I searched for a solution and stumbled upon a hack to enable launch the Omnia 7 Diagnostic Menu and the Micro USB Test.

Here's what you need to do
  • Open the phone application
  • Dial  # # 634 # and press Call
  • This will launch the diagnostic menu
  • Enter  * # 7284 #
  • If the code above is entered properly then the Micro USB Test app launches 
  • Select Modem, Tethered Call
  • You are prompted to restart the device
  • Connect your Omnia 7 to your computer via USB
In my attempt I was prompted to install the Samsung USB Driver and Windows 7 provided me with a link. Try it out :)

Friday, November 5, 2010

Chris' Puzzle Game on the Windows Phone 7 Marketplace

I got my first application published on the Marketplace. The process was surprisingly fast, took overnight to get it certified and another day before it appeared on the Marketplace. I have a video demo of the game here and I demonstrate how parts of the game was built in an article called Writing a Puzzle Game for Windows Phone 7 using XNA. Try the game out, I'd love to get some feedback. It's a game made over a weekend and the main purpose was to experience the publishing process. If you have some comments, suggestions, or questions on the game then please send them to me and I'll see what I can do.


Tuesday, November 2, 2010

How to launch the Marketplace in the Windows Phone 7 Emulator

You probably noticed by now that the default Windows Phone 7 emulator only contains Internet Explorer and the Settings. I stumbled upon a tip from Daniel Vaughan about Launchers and Choosers today and I learned about a task that can start up the Marketplace Hub. Unfortunately you will have to create an application that calls into the Launcher API to accomplish this.

Here's what you need to do:

1) Create a new Silverlight Windows Phone Application
2) In your MainPage.cs and add a using directive to the Microsoft.Phone.Tasks namespace.
3) Add the following in the constructor of MainPage.cs after calling the InitializeComponent() method:

var task = new MarketplaceHubTask();
task.ContentType = MarketplaceContentType.Applications;
task.Show();

4) Launch the application and you should be good to go.

Here's how the Marketplace looks like on the emulator:


Click here to see a list of supported launchers and choosers for Windows Phone 7. You can read more about Launchers and Choosers here.

Tuesday, October 26, 2010

How to use the keyboard in the Windows Phone 7 Emulator

The one thing that irritated me the most about the Windows Phone 7 emulator the first time I used it was that the host computer keyboard is not directly mapped to the emulator. This means you by default have to use the software input panel that is built in Windows Phone 7.

I immediately looked for a solution and found some MSDN documentation on the keyboard mappings for the emulator.

To enable the keyboard in the emulator - press the PAGE UP key or PAUSE/BREAK key.

To disable the keyboard in the emulator - press the PAGE DOWN key PAUSE/BREAK key.

If you want to learn more then I suggest you check out this article called Keyboard Mapping for Windows Phone Emulator

Monday, October 25, 2010

Windows Phone 7 Unlocked Emulator

If are not pleased with the emulator that shipped with the Windows Phone 7 developer tools then here's a quick way to replace the trimmed down emulator with the full version

1) Create a back up of your current emulator image file, to avoid re-installing the developer tools if in case anything goes wrong. This file will be under [PROGRAM FILES (x86)]\Microsoft SDKs\Windows Phone\v7.0\Emulator\Images\ and is called WM70C1.en-US.bin

2) Find and download an unlocked image in your search engine of choice, search for WM70C1.en-US.unlocked :)

3) Once downloaded, Copy the unlocked emulator image to [PROGRAM FILES (x86)]\Microsoft SDKs\Windows Phone\v7.0\Emulation\Images\

4) Rename the unlocked emulator image to WM70C1.en-US.bin

5) Run the emulator :)

If all goes well you should be able to run the unlocked emulator and it should look like this:


I would advise to make sure that you can deploy and debug applications with Visual Studio. If not then you probably found an older version of the unlocked emulator image and you should try to search again for a newer version.

Friday, October 22, 2010

Chris' Puzzle Game for Windows Phone 7

I finally managed to find the time to complete my puzzle game for Windows Phone 7. This will be my first attempt to publish anything on the marketplace. Let's see how it goes!


If you're interested in how I made the game then I'll be more than willing to share. I might be able to post code directly as this is soon be available commercially, but I can always give some tips and share knowledge. I wrote a step by step article on how to Create a Puzzle Game for Windows Phone 7 using XNA. The puzzle game logic is described in this article and I pretty use the same logic.

Thursday, October 21, 2010

Motorola Dual Bluetooth Stack Support

Apparently most Motorola devices support 2 Bluetooth Stacks: Microsoft and StoneStreet. To switch which stack to use you would have to make some changes in the registry and restart the device.

[HKEY_LOCAL_MACHINE\SOFTWARE\SymbolBluetooth]

"SSStack"=DWORD:1

0 = Microsoft Stack
1 = StoneStreet One Stack

The StoneStreet One Stack is supported in all devices except the ES400 and MC65. For the Microsoft stack, any device running Windows Mobile 6.1, Windows Mobile 6.5.x and Windows CE 6.0

Motorola recommendeds using the Microsoft stack for new development and I strongly agree with Motorola on this!

Wednesday, October 20, 2010

Widcomm Bluetooth Pairing Prompt

Not so long ago I had a project that involved Bluetooth communication from a windows mobile device to some custom designed hardware. Everything went smoothly with only a few bumps during the scope of the project. When we had the applications on the field, certain users where running on devices that used the Widcomm Bluetooth Stack and that gave us a few headaches. For one, our system doesn't use any security features in bluetooth hence it doesn't not require pairing. Our security architecture is service based and checks for certain keys being passed back and forth to an online service. Very standard stuff. The problem we had with the devices running on a Widcomm Bluetooth stack was that the user was always prompted to pair even though the device did not require pairing. The application was not designed to handle user input aside from logging in/out and some diagnostic features. The application was designed to just run quietly in the background with the device tucked in the users pocket.

Since quite a few devices use the Widcomm Bluetooth Stack I needed a quick fix/hack to avoid the user having to pick up the device and click "Yes" on the security prompt to communicate with the device. The fix had to be as simple as possible and had to run without disrupting the user. My not so clean solution was to create a small application that does nothing but check if the Widcomm security pairing prompt app was running and if so send a keystroke event to simulate the user clicking on "Yes".

The Widcomm security prompt app main window uses the class name Broadcom_BTWizard with the window name Bluetooth. I check if this window exists and send the F1 keyboard event to simulate clicking on the left hardware button on the device

Here's a code snippet in C#

[DllImport("coredll.dll")]
static extern IntPtr FindWindow(string lpClassName, string lpWindowName);
 
[DllImport("coredll")]
static extern void keybd_event(byte bVk, byte bScan, int dwFlags, int dwExtraInfo);
 
const int KEYEVENTF_KEYUP = 0x02;
const int KEYEVENTF_KEYDOWN = 0x00;
static bool running = true;
 
static void CloseBroadcomWindowWorker()
{
    while (running)
    {
        var hwnd = FindWindow("Broadcom_BTWizard", "Bluetooth");
        if (hwnd != IntPtr.Zero)
        {
            keybd_event((byte)Keys.F1, 0, KEYEVENTF_KEYDOWN, 0);
            keybd_event((byte)Keys.F1, 0, KEYEVENTF_KEYUP, 0);
        }
 
        Thread.Sleep(5000);
    }
}


This is of course not the best solution but if you have a similar problem then this might save you some time if your only requirement is to get it to work as soon as possible. Otherwise, I would suggest avoiding the Widcomm Bluetooth Stack and just go for devices that use the Microsoft Bluetooth Stack

Friday, October 15, 2010

Windows Phone 7 Game State Management using XNA

Not so long ago I wrote a Puzzle game for Windows Phone 7 using XNA. The game was really simple and had no menu or state management. Luckily, I recently stumbled upon a sample on MSDN that describes the basics of implementing game state management using XNA.

To try things out a bit more I modified my existing puzzle game and included the sample game state management code. The results are pretty amazing!

Here's how my Puzzle Game for Windows Phone 7 looks like now:


If you're getting into writing games for Windows Phone 7 using XNA then you should really check out the Game State Management sample here:
http://create.msdn.com/en-US/education/catalog/sample/game_state_management

I described in detail how I built my puzzle game application in an article called Writing a Puzzle Game for Windows Phone 7 using XNA. Try checking it out, I hope you find it interesting

Monday, October 11, 2010

Microsoft Advertising SDK for Windows Phone 7

I recently stumbled upon the Microsoft Advertising SDK for Windows Phone 7. At the client side, it provides a control called AdControl that retrieves banner information based on the specified ApplicationId and AdUnitId. In order to use the Microsoft Advertising’s ad delivery system, you first need to create a Microsoft pubCenter account.

Here's some information extracted from the help file included in the SDK:
The Microsoft Advertising SDK for Windows Phone 7 provides an AdControl that you can use to publish advertisements in Windows Phone 7 applications. The Microsoft Advertising AdControl communicates with Microsoft servers that deliver ads. When these servers return ads to the AdControl, the AdControl will render the ads within your Windows Phone 7 application.

In order to use the Microsoft Advertising’s ad delivery system, you first need to create a Microsoft pubCenter account. Microsoft pubCenter is an advertising publisher management system that enables you to create ad placements and collect advertising revenue. Once you create an account, you will register your mobile applications by using Microsoft pubCenter. When a Windows Phone 7 application is registered with Microsoft pubCenter it will receive a unique mobile application identifier (ApplicationId).

When a mobile application displays a window, the application can define a space within the window for the presentation of advertisements. Each ad placement that is presented is called an ad unit. You will define and create mobile ad units by using Microsoft pubCenter, and each mobile ad unit will be assigned a unique ad unit identifier (AdUnitId).

The ApplicationId and the AdUnitId are required for your Windows Phone 7 application to request ads from Microsoft Advertising’s ad delivery system. The ApplicationId and the AdUnitId identify the ad unit that is delivered to a Windows Phone 7 application and the publisher that will receive credit for displaying the ad unit.

It takes only a few easy steps to register with Microsoft pubCenter, create ad units, manage revenues, and integrate the Microsoft Advertising Mobile AdControl for Windows Phone 7 into your application.

Sounds fairly simple but not everything can be perfect in a first release. The first problem I found was that the pubCenter Registration and Payment will only be available for publishers from the United States. So to be eligable for payments one must for example have a valid US address and a valid Tax Information Number (TIN) if the publisher is a business entity. As I'm not based in the US, I haven't tried this yet. But based on what I've read in the documentation, using the AdControl in a Windows Phone 7 application seems fairly easy.


Here are some C# and XAML snippets:


The following C# code instantiates a new AdControl and sets mandatory targeting parameters.

AdControl ctrl = new AdControl();
ctrl.ApplicationId = "testapplication";
ctrl.AdUnitId = "testadunit";
this.ContentGrid.Children.Add(ctrl);


The following C# code instantiates a new AdControl with manual ad rotation.

string applicationId = "testapplication";
string adUnitId = "testadunit";
bool isAutoRotation = false;
AdControl ctrl = new AdControl(applicationId, adUnitId, AdModel.Contextual, isAutoRotation);
 
ctrl.Width = 480;
ctrl.Height = 80;
this.ContentGrid.Children.Add(ctrl);


The following XAML instantiates a new AdControl with mandatory targeting parameters.

<Grid xmlns:adctl="clr-namespace:Microsoft.Advertising.Mobile.UI;assembly=Microsoft.Advertising.Mobile.UI" Grid.Row="1">
   <adctl:AdControl Height="80" Width="480" AdUnitId="Test" ApplicationId="Test" AdModel="Contextual" />
</Grid>


I'm looking forward for these tools to be available in Europe so I can try them out.

Wednesday, October 6, 2010

How to retrieve a list of installed applications using .NETCF

In this short post I'd like to demonstrate how to retrieve a list of installed applications on a Windows Mobile device using OMA Client Provisioning. First you need to add a reference to the Microsoft.WindowsMobile.Configuration assembly. To retrieve the list we need to process a specific configuration (UnInstall Configuration Service Provider) using the ConfigurationManager.ProcessConfiguration method. The configuration is described in an XML and the response to this will also be described in XML

To query the device we process this configuration:

<wap-provisioningdoc>
  <characteristic-query type="UnInstall"/>
</wap-provisioningdoc>


The query above will only return installed application that can be uninstalled. The device would then respond with something like this:

<wap-provisioningdoc>
  <characteristic type="UnInstall">
    <characteristic type="Microsoft Application#2">
      <parm name="uninstall" value="0"/>
    </characteristic>
    <characteristic type="Microsoft Application#1">
      <parm name="uninstall" value="0"/>
    </characteristic>
    <characteristic type="Demo Home Screen">
      <parm name="uninstall" value="0"/>
    </characteristic>
  </characteristic>
</wap-provisioningdoc>


And here's how to accomplish this task using .NETCF and C#

var doc = new XmlDocument();
doc.LoadXml(@"<wap-provisioningdoc><characteristic-query type=""UnInstall""/></wap-provisioningdoc>");
doc = ConfigurationManager.ProcessConfiguration(doc, true);
 
var nodes = doc.SelectNodes("wap-provisioningdoc/characteristic[@type='UnInstall']/characteristic/@type");
foreach (var node in nodes.Cast<XmlNode>())
{
    Trace.WriteLine(node.InnerText);
}


I hope you found this useful.

Wednesday, September 15, 2010

Writing a Puzzle Game for Windows Phone 7 using XNA

This article is a step by step guide on how to write a puzzle game for Windows Phone 7 using XNA. Before we get started you will need the Windows Phone 7 Developer Tools. Please note that I'm not really a game developer and I might not be doing the best practices. The intention of this article is just to demonstrate how easy it is to write a game using XNA even if one has little to no experience in game development.

I've been playing around with XNA these past few nights and decided to write a few casual games. The first prototype I have is a port of my old Puzzle Game. The game is still really incomplete, like there is no menu or state management which means you can't shut it down properly and stuff. But I thought I'd share some thoughts on my experience with it and at the same time share some code.

The structure of the game is fairly simple. I have 2 collections: one contains an image, another contains an index to the each of the elements of the first collection and its the area where to display the image on the screen. The collection that contains the indexes is my scrambled puzzle. Each time a piece is moved, I update the order of my scrambled list afterwards I check if all the items in my scrambled list are correctly sorted in an ascending fashion. If all the items are sorted properly then it means that the puzzle was solved.

Enough said and let's get started. The first step is to of course fire up Visual Studio and create a new XNA Game Studio 4.0 - Windows Phone Game project. Let's call the project PuzzleGame


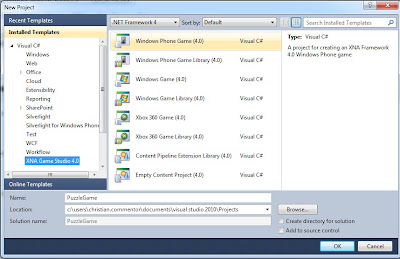
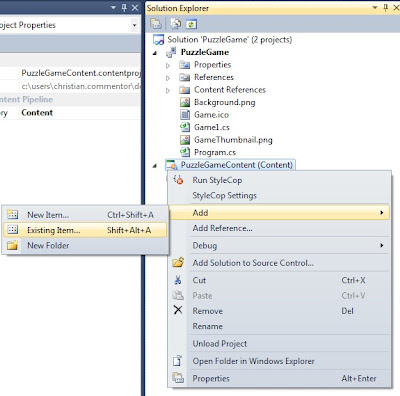
Now that we have a project we can start adding some content or game assets. For this simple project, we will use 3 different game assets: the puzzle image, and 2 Sprite Font for drawing the elapsed playing time and to draw text to congratulate the player once they complete the puzzle. To add content, right click on the PuzzleGameContent project, then click on Add.


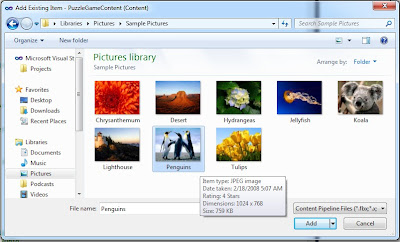
For the puzzle image, we can pick up one of the sample pictures included in Windows 7 (e.g. \Users\Public\Pictures\Sample Pictures)


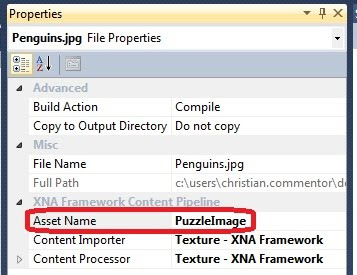
After adding the puzzle image we should change the Asset Name property to PuzzleImage. This can be done through the Properties Window (Right click on the added image in the Solution Explorer and click Properties)


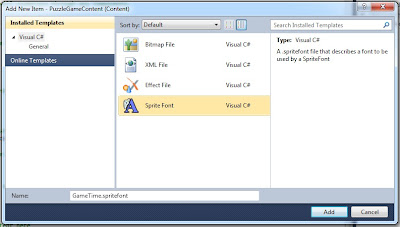
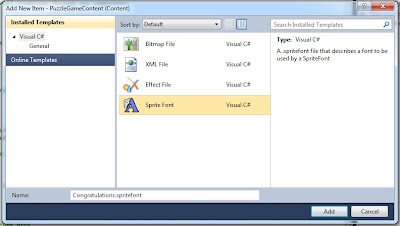
To add Sprite Fonts, right click on the content project, click Add - New Item, then select Sprite Font. Let's add 2 sprite fonts and call them GameTime and Congratulations


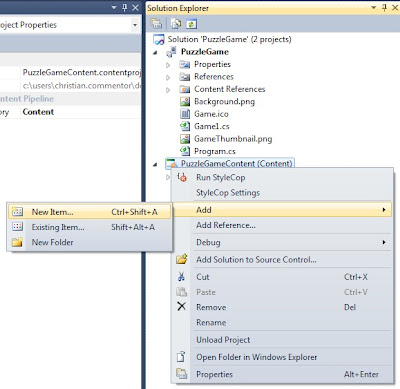
Let's change the Asset Name of the Sprite Fonts we just added to GameTimeFont and CongratulationsFont


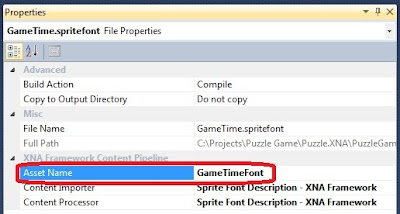
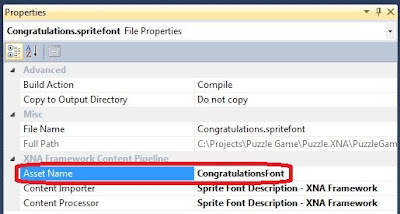
The SpriteFont content is actually just an XML file. The GameTime font's default description should be good enough but let's change the Congratulations font description to use a larger size. Open Congratulations.spritefont from the solution explorer and change the Size to 48, and change the Style to Bold

Now that we have our game assets in place we can start coding. A lot of initial code is generated when creating a new XNA Game Studio project. To start things clean let's rename default Game1 class to PuzzleGame and delete all the contents leaving the PuzzleGame class empty.

Before we start implementing our PuzzleGame class we'll need to create a class which will represent a piece of the puzzle, let's call this PuzzlePiece

class PuzzlePiece
{
    public int Index { get; set; }
    public Vector2 Bounds { get; set; }
 
    public override int GetHashCode()
    {
        return Index.GetHashCode();
    }
 
    public override bool Equals(object obj)
    {
        var piece = obj as PuzzlePiece;
        if (piece != null)
            return Index.Equals(piece.Index);
        return base.Equals(obj);
    }
}


We'll also need an enumeration that describes the state of the game. This state describes what to draw on the screen. Let's call this enum DrawMode. There are 2 simple states of the game:

1. Puzzle - Draws the puzzle game
2. Congratulations - Draws a "Congratulations" text once the player solves the puzzle

enum DrawMode
{
    Puzzle,
    Congratulations
}


Now we can start implementing our PuzzleGame class. The first step is to define our global variables and the constructor method

GraphicsDeviceManager graphics;
SpriteBatch spriteBatch;
Texture2D previewTexture;
Vector2 previewVector, emptyPiece, totalGameTimeVector, congratulationsVector;
SpriteFont gameTimerFont,congratulationsFont;
Dictionary<int, Texture2D> puzzlePieces;
Dictionary<int, PuzzlePiece> scrambledPieces;
DrawMode Mode;
int height, width;
double elapsedTime, playingTime;
Queue<Keys> pendingCommands;
const int PIECE_COUNT = 4 * 4;
bool solved;
static bool animating;
 
public PuzzleGame()
{
    graphics = new GraphicsDeviceManager(this);
    Content.RootDirectory = "Content";
}


Next step is to implement the Initialize() method. This method allows the game to perform any initialization it needs before it starts to run. With a simple game such as this one could debate where to put the initialization code, I could easily see myself having my initialize code in the constructor method. To make this example as XNA'ish let's initialize our non-content variables in the Initialize() method.

/// <summary>
/// Allows the game to perform any initialization it needs to before starting to run.
/// This is where it can query for any required services and load any non-graphic
/// related content.  Calling base.Initialize will enumerate through any components
/// and initialize them as well.
/// </summary>
protected override void Initialize()
{
    pendingCommands = new Queue<Keys>();
    Mode = DrawMode.Puzzle;
    previewVector = new Vector2(0, 0);
    totalGameTimeVector = new Vector2(10, 10);
 
    base.Initialize();
}


Next we implement the LoadContent() and UnloadContent()

/// <summary>
/// LoadContent will be called once per game and is the place to load
/// all of your content.
/// </summary>
protected override void LoadContent()
{
    spriteBatch = new SpriteBatch(GraphicsDevice);
    previewTexture = Content.Load<Texture2D>("PuzzleImage");
    gameTimerFont = Content.Load<SpriteFont>("GameTimeFont");
    congratulationsFont = Content.Load<SpriteFont>("CongratulationsFont");
 
    var size = congratulationsFont.MeasureString("Congrautulations!");
    congratulationsVector = new Vector2(
        (GraphicsDevice.Viewport.Width - size.X) / 2,
        (GraphicsDevice.Viewport.Height - size.Y) / 2);
 
    Divide();
    Scramble();
}
 
/// <summary>
/// UnloadContent will be called once per game and is the place to unload
/// all content.
/// </summary>
protected override void UnloadContent()
{
    previewTexture.Dispose();
    foreach (var item in puzzlePieces)
        item.Value.Dispose();
 
    spriteBatch.Dispose();
}


You probably noticed that LoadContent calls methods called Divide() and Scramble().

The Divide() method splits the puzzle image into tiny pieces represented by the PuzzlePiece class. The full puzzle image is stored in a Texture2D object called previewTexture, to split this into pieces I copy the color information of the puzzle image within a specified bounds into an array of type Color and then I set this color information in a new instance of Texture2D.

private void Divide()
{
    int idx = 0;
    int cells = Convert.ToInt32(Math.Sqrt(PIECE_COUNT));
    height = GraphicsDevice.Viewport.Height / cells;
    width = GraphicsDevice.Viewport.Width / cells;
    puzzlePieces = new Dictionary<int, Texture2D>();
    for (int y = 0; y < GraphicsDevice.Viewport.Height; y += height)
    {
        for (int x = 0; x < GraphicsDevice.Viewport.Width; x += width)
        {
            var rectangle = new Rectangle(x, y, width, height);
            var data = new Color[width * height];
            previewTexture.GetData<Color>(0, rectangle, data, 0, data.Length);
 
            var piece = new Texture2D(GraphicsDevice, width, height);
            piece.SetData(data);
 
            puzzlePieces.Add(idx++, piece);
        }
    }
}


The Scramble() method does exactly what the method name describes, it scrambles the puzzle. The field called scrambledPieces is a key/value pair collection that uses the index of the puzzlePieces collection as the key and the bounds of this image to be drawn on the screen as the value. The bounds of the image is stored in a Vector2 object.

private void Scramble()
{
    int idx = 0;
    var random = new Random();
    int capacity = puzzlePieces.Count - 1;
    scrambledPieces = new Dictionary<int, PuzzlePiece>(puzzlePieces.Count);
 
    for (int y = 0; y < GraphicsDevice.Viewport.Height; y += height)
    {
        for (int x = 0; x < GraphicsDevice.Viewport.Width; x += width)
        {
            if (idx < capacity)
            {
                var piece = new PuzzlePiece();
                while (true)
                {
                    piece.Index = random.Next(0, capacity);
                    if (!scrambledPieces.ContainsValue(piece))
                        break;
                }
 
                piece.Bounds = new Vector2(x, y);
                scrambledPieces.Add(idx++, piece);
            }
            else
                emptyPiece = new Vector2(x, y);
        }
    }
    scrambledPieces.Add(idx, new PuzzlePiece { Index = -1 });
}


All we need now is to implement the Game Loop.

The Update() method will contain the game logic. The game logic will be used for updating the game surface, collision detection, accepting and handling user input, background music, sounds effects, etc. In our game we use it for accepting and handling user input. We accept the user input through polling the Mouse state by calling the static method Mouse.GetState(). We handle the user input by doing a hit test to get which puzzle piece was clicked and moving this piece. Only one piece can be moved at a time and this piece can only move up, down, left, or right. For those who are not familiar with what a hit test is, here's my attempt to define it: A hit test is a way of detecting if 2 objects are touching or intersecting with each other. In our case, we use hit testing to figure out which puzzle piece was clicked by checking all the pieces of the puzzle if the mouse position is inside its bounds. Moving a puzzle piece is implemented as a very basic animation that runs on a separate thread. User input is not handled while the puzzle pieces are being moved around. The update method also updates the game playing time which we later on draw on the screen.

/// <summary>
/// Allows the game to run logic such as updating the world,
/// checking for collisions, gathering input, and playing audio.
/// </summary>
/// <param name="gameTime">Provides a snapshot of timing values.</param>
protected override void Update(GameTime gameTime)
{
    var mouseState = Mouse.GetState();
    if (mouseState.LeftButton == ButtonState.Pressed)
    {
        if (animating)
        {
            base.Update(gameTime);
            return;
        }
 
        var clickedRectangle = new Rectangle(mouseState.X, mouseState.Y, width, height);
        var pieceRect = new Rectangle(0, 0, width, height);
 
        for (int i = 0; i < scrambledPieces.Count; i++)
        {
            pieceRect.X = (int)scrambledPieces[i].Bounds.X;
            pieceRect.Y = (int)scrambledPieces[i].Bounds.Y;
 
            if (!pieceRect.Intersects(clickedRectangle))
                continue;
 
            if (mouseState.X >= emptyPiece.X &&
                mouseState.X <= emptyPiece.X + width &&
                mouseState.Y >= emptyPiece.Y &&
                mouseState.Y <= emptyPiece.Y + height)
                continue;
 
            Keys command = Keys.None;
            if (pieceRect.X >= emptyPiece.X && pieceRect.X <= emptyPiece.X)
            {
                if (pieceRect.Y - height == emptyPiece.Y)
                    command = Keys.Up;
                else if (pieceRect.Y + height == emptyPiece.Y)
                    command = Keys.Down;
            }
            else if (pieceRect.Y >= emptyPiece.Y && pieceRect.Y <= emptyPiece.Y)
            {
                if (pieceRect.X - width == emptyPiece.X)
                    command = Keys.Left;
                else if (pieceRect.X + width == emptyPiece.X)
                    command = Keys.Right;
            }
 
            if (command != Keys.None && !pendingCommands.Contains(command))
            {
                pendingCommands.Enqueue(command);
                Debug.WriteLine("Clicked: " + i);
            }
            break;
        }
    }
    else
        elapsedTime += gameTime.ElapsedGameTime.TotalMilliseconds;
 
    if (elapsedTime >= 10)
    {
        if (pendingCommands.Count > 0)
            MovePiece(pendingCommands.Dequeue());
        elapsedTime = 0;
    }
 
    if (!solved)
        playingTime += gameTime.ElapsedGameTime.TotalMilliseconds;
 
    base.Update(gameTime);
}


The MovePiece() method does a hit test to find which piece to move. Once the correct piece is found the Animate() method is called.

private void MovePiece(Keys command)
{
    for (int i = 0; i < scrambledPieces.Count; i++)
    {
        switch (command)
        {
            case Keys.Up:
                if (scrambledPieces[i].Bounds.X == emptyPiece.X && scrambledPieces[i].Bounds.Y - height == emptyPiece.Y)
                {
                    Animate(command, i);
                    return;
                }
                break;
            case Keys.Down:
                if (scrambledPieces[i].Bounds.X == emptyPiece.X && scrambledPieces[i].Bounds.Y + height == emptyPiece.Y)
                {
                    Animate(command, i);
                    return;
                }
                break;
            case Keys.Left:
                if (scrambledPieces[i].Bounds.Y == emptyPiece.Y && scrambledPieces[i].Bounds.X - width == emptyPiece.X)
                {
                    Animate(command, i);
                    return;
                }
                break;
            case Keys.Right:
                if (scrambledPieces[i].Bounds.Y == emptyPiece.Y && scrambledPieces[i].Bounds.X + width == emptyPiece.X)
                {
                    Animate(command, i);
                    return;
                }
                break;
        }
    }
}


The Animate() method starts a thread in the ThreadPool which will move the puzzle piece by 2 pixels at a time until the piece is placed in the empty area. The empty area information is stored in the emptyPiece object. Once the piece is in the empty area the scrambled index of the piece is updated together with its new bounds. Finally a check if the puzzle was solved by the move is done.

private void Animate(Keys direction, int i)
{
    animating = true;
 
    ThreadPool.QueueUserWorkItem((state) =>
    {
        try
        {
            const int INCREMENT = 2;
            var newEmptyPiece = scrambledPieces[i].Bounds;
 
            while (scrambledPieces[i].Bounds != emptyPiece)
            {
                switch (direction)
                {
                    case Keys.Up:
                        scrambledPieces[i].Bounds = new Vector2(emptyPiece.X, scrambledPieces[i].Bounds.Y - INCREMENT);
                        break;
                    case Keys.Down:
                        scrambledPieces[i].Bounds = new Vector2(emptyPiece.X, scrambledPieces[i].Bounds.Y + INCREMENT);
                        break;
                    case Keys.Left:
                        scrambledPieces[i].Bounds = new Vector2(scrambledPieces[i].Bounds.X - INCREMENT, emptyPiece.Y);
                        break;
                    case Keys.Right:
                        scrambledPieces[i].Bounds = new Vector2(scrambledPieces[i].Bounds.X + INCREMENT, emptyPiece.Y);
                        break;
                }
                Thread.Sleep(1);
            }
 
            emptyPiece = newEmptyPiece;
        }
        finally
        {
            UpdateScrambledIndex(direction, i);
            CheckForCompletion();
            animating = false;
        }
    });
}
 
private void UpdateScrambledIndex(Keys command, int index)
{
    int newIndex = -1;
    int INCREMENT = Convert.ToInt32(Math.Sqrt(PIECE_COUNT));
    switch (command)
    {
        case Keys.Up:
            newIndex = index - INCREMENT;
            if (newIndex < 0) newIndex = 0;
            break;
        case Keys.Down:
            newIndex = index + INCREMENT;
            if (newIndex > scrambledPieces.Count - 1) newIndex = scrambledPieces.Count - 1;
            break;
        case Keys.Left:
            newIndex = index - 1;
            if (newIndex < 0) newIndex = 0;
            break;
        case Keys.Right:
            newIndex = index + 1;
            if (newIndex > scrambledPieces.Count - 1) newIndex = scrambledPieces.Count - 1;
            break;
    }
 
    var temp = scrambledPieces[newIndex];
    scrambledPieces[newIndex] = scrambledPieces[index];
    scrambledPieces[index] = temp;
}
 
private void CheckForCompletion()
{
    for (int i = 0; i < scrambledPieces.Count - 1; i++)
        if (scrambledPieces[i].Index != i)
            return;
 
    solved = true;
    Mode = DrawMode.Congratulations;
}


Last but not the least we implement the Draw() method. This is where we render the screen. We always start by clearing the screen and afterwards adding sprites to our SpriteBatch. In our game we only have 2 ways of rendering the screen: rendering the puzzle game in play; and rendering if the puzzle was solved.

To render the puzzle game I add a sprite that draws the game playing time on the top left corner then I add a sprite for each piece of the puzzle by iterating through my scrambledPieces collection..

To render the screen when the puzzle is solved I draw 2 sprites. One is the playing time and the other is "Congratulations"

/// <summary>
/// This is called when the game should draw itself.
/// </summary>
/// <param name="gameTime">Provides a snapshot of timing values.</param>
protected override void Draw(GameTime gameTime)
{
    GraphicsDevice.Clear(Color.Black);
 
    spriteBatch.Begin(SpriteSortMode.BackToFront, BlendState.AlphaBlend);
 
    switch (Mode)
    {
        case DrawMode.Puzzle:
            spriteBatch.DrawString(gameTimerFont, new TimeSpan(0, 0, 0, 0, (int)playingTime).ToString(), totalGameTimeVector, Color.White);
            for (int i = 0; i < scrambledPieces.Count; i++)
            {
                if (scrambledPieces[i].Index == -1) continue;
                var piece = puzzlePieces[scrambledPieces[i].Index];
                spriteBatch.Draw(piece, scrambledPieces[i].Bounds, Color.White);
            }
            break;
        case DrawMode.Congratulations:
            spriteBatch.DrawString(gameTimerFont, new TimeSpan(0, 0, 0, 0, (int)playingTime).ToString(), totalGameTimeVector, Color.White);
            spriteBatch.DrawString(congratulationsFont, "Congratulations!", congratulationsVector, Color.White);
            break;
    }
 
    spriteBatch.End();
 
    base.Draw(gameTime);
}


I hope you found this article useful and educational. You can grab the source code here

Monday, August 23, 2010

Copying files from the Desktop to the Device using .NET

Someone asked me recently how to copy files from the desktop to the device after reading my old article called How to copy files from the Device to the Desktop using .NET. Well here's how to do it:

First, we'll need our P/Invokes to rapi.dll

[DllImport("rapi.dll")]
static extern int CeRapiInit();
 
[DllImport("rapi.dll")]
static extern int CeRapiUninit();
 
[DllImport("rapi.dll", CharSet = CharSet.Unicode)]
static extern IntPtr CeCreateFile(
  string lpFileName,
  uint dwDesiredAccess,
  int dwShareMode,
  int lpSecurityAttributes,
  int dwCreationDisposition,
  int dwFlagsAndAttributes,
  int hTemplateFile);
 
[DllImport("rapi.dll", CharSet = CharSet.Unicode)]
internal static extern int CeWriteFile(
    IntPtr hFile,
    byte[] lpBuffer,
    int nNumberOfbytesToWrite,
    ref int lpNumberOfbytesWritten,
    int lpOverlapped);
 
[DllImport("rapi.dll", CharSet = CharSet.Unicode)]
internal static extern int CeSetFileTime(
    IntPtr hFile,
    ref long lpCreationTime,
    ref long lpLastAccessTime,
    ref long lpLastWriteTime);
 
const int BUFFER_SIZE = 1024 * 5; // 5k transfer buffer
const int CREATE_ALWAYS = 2;
const int ERROR_SUCCESS = 0;
const int FILE_ATTRIBUTE_NORMAL = 0x80;
const uint GENERIC_WRITE = 0x40000000;
const int INVALID_HANDLE_VALUE = -1;


Now let's wrap all those in a method called CopyToDevice(string localFile, string remoteFile). The localFile is the file located on the desktop and the remoteFile is the destination filename on the device.

void CopyToDevice(string localFile, string remoteFile)
{
    var rapi = CeRapiInit() == ERROR_SUCCESS;
    if (!rapi)
        return;
 
    try
    {
        var filePtr = CeCreateFile(remoteFile, GENERIC_WRITE, 0, 0, CREATE_ALWAYS, FILE_ATTRIBUTE_NORMAL, 0);
        if (filePtr == new IntPtr(INVALID_HANDLE_VALUE))
            return;
 
        using (var localFileStream = new FileStream(localFile, FileMode.Open, FileAccess.Read))
        {
            var byteswritten = 0;
            var position = 0;
            var buffer = new byte[BUFFER_SIZE];
 
            var bytesread = localFileStream.Read(buffer, position, BUFFER_SIZE);
            while (bytesread > 0)
            {
                position += bytesread;
                if (CeWriteFile(filePtr, buffer, bytesread, ref byteswritten, 0) == ERROR_SUCCESS)
                    return;
 
                try
                {
                    bytesread = localFileStream.Read(buffer, 0, BUFFER_SIZE);
                }
                catch
                {
                    bytesread = 0;
                }
            }
        }
    }
    finally
    {
        CeRapiUninit();
    }
}


To use the code above you will have to know the full path of the file on the desktop.
I hope you found this useful.