Friday, December 25, 2009

How to get the IP Address of a device in .NETCF

Here's something I see asked every now and then in the community forums. The solution is a one liner that looks like this:

IPAddress[] addresses = Dns.GetHostEntry(Dns.GetHostName()).AddressList;

The code above retrieves the IP addresses for each connected network adapter of the device. The Dns and IPAddress classes belong to the System.Net namespace.

Wednesday, December 23, 2009

How to Vibrate a Smartphone / Windows Mobile Standard device in .NETCF

The Vibrate API is only available in the Windows Mobile Standard or Smartphone platform. This has been so since Smartphone 2002. Calling Vibrate() will cause the device to vibrate, and VibrateStop() will stop it.

Here's a simple managed wrapper for the Vibrate API

public class Vibrate
{
    [DllImport("aygshell.dll")]
    static extern int Vibrate(int cvn, IntPtr rgvn, bool fRepeat, uint dwTimeout);
 
    [DllImport("aygshell.dll")]
    static extern int VibrateStop();
 
    const uint INFINITE = 0xffffffff;
 
    public static bool Play()
    {
        VibratePlay(0, IntPtr.Zero, true, INFINITE);
    }
 
    public static void Stop()
    {
        VibrateStop();
    }
}

For more information on the Vibrate API, you might want to check the MSDN Documentation out.

Monday, December 21, 2009

How to switch on/off the speaker phone in .NETCF

A few years back, I stumbled upon this article while trying to find a solution on how to switch on/off the speaker phone. It uses a DLL found in Windows Mobile 5 (and higher) devices called ossvcs.dll. This library exposes some pretty neat API's for controlling communication related features in the device (like controlling the wireless/bluetooth radio and other cool stuff).

Here's a quick way for switching the speaker on/off in .NETCF

[DllImport("ossvcs.dll", EntryPoint = "#218")]        
static extern int SetSpeakerMode(uint mode);
 
void EnableSpeakerPhone()
{
    SetSpeakerMode(1);
}
 
void DisableSpeakerPhone()
{
    SetSpeakerMode(0);
}

Unfortunately, ossvcs.dll is not documented and might not exist in the future. But for now, it pretty much works in all devices I've tried

Sunday, December 20, 2009

How to enumerate storage cards in .NETCF

In Windows Mobile, external storage cards are usually represented as the '\SD Card' or '\Storage Card' folder, this varies from device to device. A simple way to enumerate the external storage cards is to check all directories under the root directory that have the temporary attribute flag set.

Here's a quick way to do so in .NETCF:

public static List<string> GetStorageCards()
{
    var list = new List<string>();
    var root = new DirectoryInfo("\\");
    foreach (DirectoryInfo directory in root.GetDirectories()) 
    {
        if (FileAttributes.Temporary == (directory.Attributes & FileAttributes.Temporary))
            list.Add(directory.Name);
    }
    return list;
}

Saturday, December 19, 2009

How to send keyboard events in .NETCF

I've seen some people ask how to how to send keyboard events in .NET Compact Framework in the community. Although the operation is pretty simple, I'll share a code snippet anyway.

const int KEYEVENTF_KEYPRESS = 0x0000;
const int KEYEVENTF_KEYUP = 0x0002;
 
[DllImport("coredll.dll")]
static extern void keybd_event(byte bVk, byte bScan, int dwFlags, int dwExtraInfo);
 
void SendKey(Keys key)
{
    keybd_event((byte) key, 0, KEYEVENTF_KEYPRESS, 0);
    keybd_event((byte) key, 0, KEYEVENTF_KEYUP, 0);
}

The code above will send the keyboard event to currently focused window or control

Thursday, October 22, 2009

Generic Bordered Control Base for .NETCF

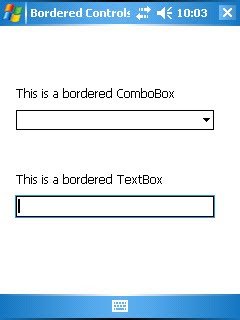
For quite some time I've been using Google Chrome as my browser. The behavior of some of the controls are similar with Safari (probably because they use the same rendering engine). Anyway, I really liked the way that a border is drawn around the control whenever it receives focus. This inspired me to create a generic base control that draws a border around any control you use it for. The code I use is pretty much the same with my previous article, Extending the TextBox Control in .NETCF.

To accomplish this I created an abstract control that takes a generic parameter of type Control and has a default constructor. You might notice that in my override Font I check whether the control is in design time or run time. If in design time, we need to create a new Font object for the setter using the values passed. If we directly use the value passed the designer will crash, and at times Visual Studio will crash.

Here's how it can look like:


And here's the code for the base control:

[EditorBrowsable(EditorBrowsableState.Never)]
public abstract class BorderedControlBase<T> : Control
    where T : Control, new()
{
    protected T innerControl;
 
    protected BorderedControlBase()
    {
        innerControl = new T();
        innerControl.GotFocus += delegate { OnGotFocus(EventArgs.Empty); };
        innerControl.LostFocus += delegate { OnLostFocus(EventArgs.Empty); };
        innerControl.TextChanged += delegate { OnTextChanged(EventArgs.Empty); };
        Controls.Add(innerControl);
    }
 
    protected override void OnResize(EventArgs e)
    {
        base.OnResize(e);
        innerControl.Bounds = new Rectangle(1, 1, ClientSize.Width - 2, ClientSize.Height - 2);
        Height = innerControl.Height + 2;
    }
 
    protected override void OnParentChanged(EventArgs e)
    {
        base.OnParentChanged(e);
        Invalidate();
    }
 
    protected override void OnGotFocus(EventArgs e)
    {
        base.OnGotFocus(e);
        Invalidate();
        innerControl.Focus();
    }
 
    protected override void OnLostFocus(EventArgs e)
    {
        base.OnLostFocus(e);
        Invalidate();
    }
 
    protected override void OnPaint(PaintEventArgs e)
    {
        e.Graphics.Clear(innerControl.Focused ? SystemColors.Highlight : BackColor);
    }
 
    protected override void OnPaintBackground(PaintEventArgs e)
    {
        if (Environment.OSVersion.Platform != PlatformID.WinCE)
            base.OnPaint(e);
    }
 
    public override Font Font
    {
        get { return base.Font; }
        set
        {
            if (Environment.OSVersion.Platform != PlatformID.WinCE)
            {
                var font = new Font(value.Name, value.Size, value.Style);
                base.Font = innerControl.Font = font;
            }
            else 
                base.Font = innerControl.Font = value;
        }
    }
 
    public override string Text
    {
        get { return innerControl.Text; }
        set { innerControl.Text = value; }
    }
 
    public override bool Focused
    {
        get { return innerControl.Focused; }
    }
}

Now that we have this base control we can easily add borders to any control. Here's an example of how to use the the bordered control base:

public class BorderedTextBox : BorderedControlBase<TextBox> 
{
    ........
}
 
public class BorderedComboBox : BorderedControlBase<ComboBox> 
{
    ........
}

Of course you will still have to wrap all the members of the wrapped control you wish to expose to access them. Hope you find this useful. If you need the Visual Studio solution then you can grab it here.

Wednesday, October 21, 2009

Extending the TextBox Control in .NETCF

In this article I'm gonna extend the TextBox control. To accomplish this I will wrap the built in TextBox control in a composite control. Wrapping a control in this context means forwarding events and methods to the composite control so the parent of this control will treat it like a normal TextBox.

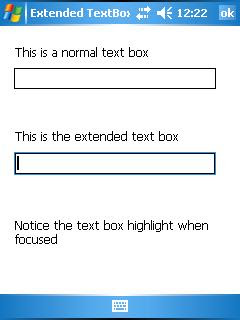
In this example I will demonstrate how how to display a border around the TextBox when it has focused and show how to add a property for disabling and enabling the caret.

To draw the border I make sure that there is 1 pixel of space around the actual TextBox control. In the OnResize event of the composite control I set the bounds of the inner TextBox the bounds of the composite control minus 1 pixel on each side. If the inner TextBox is not in Multiline mode then the height of the control is forced to match its font size, if so then I resize the composite control to be 1 pixel taller. And draw the border I just clear the drawing surface with the highlight system color if it is Focused, and with white if not.

To enable and disable the caret, we add a boolean property called EnableCaret. This property is checked every time the control receives or loses focus, to call the native HideCaret() and ShowCaret(). As I demonstrated in my previous article called How to hide the TextBox caret in .NETCF

Here's how it looks like:


And here's the code:

using System;
using System.Drawing;
using System.Runtime.InteropServices;
using System.Windows.Forms;
 
namespace ExtendedTextBox
{
    public class TextBoxEx : Control
    {
        [DllImport("coredll.dll")]
        static extern bool HideCaret(IntPtr hwnd);
 
        [DllImport("coredll.dll")]
        static extern bool ShowCaret(IntPtr hwnd);
 
        private TextBox textBox;
 
        public TextBoxEx()
        {
            textBox = new TextBox();
            textBox.GotFocus += (sender, e) => OnGotFocus(EventArgs.Empty);
            textBox.LostFocus += (sender, e) => OnLostFocus(EventArgs.Empty);
            textBox.TextChanged += (sender, e) => OnTextChanged(EventArgs.Empty);
            textBox.KeyDown += (sender, e) => OnKeyDown(e);
            textBox.KeyPress += (sender, e) => OnKeyPress(e);
            textBox.KeyUp += (sender, e) => OnKeyUp(e);
            Controls.Add(textBox);
        }
 
        public bool EnabledCaret { get; set; }
 
        #region Wrapped Properties
 
        public override Font Font
        {
            get { return base.Font; }
            set
            {
                if (Environment.OSVersion.Platform != PlatformID.WinCE)
                {
                    var font = new Font(value.Name, value.Size, value.Style);
                    base.Font = textBox.Font = font;
                }
                else
                    base.Font = textBox.Font = value;
            }
        }
 
        public override string Text
        {
            get { return textBox.Text; }
            set { textBox.Text = value; }
        }
        public bool AcceptsReturn
        {
            get { return textBox.AcceptsReturn; }
            set { textBox.AcceptsReturn = value; }
        }
 
        public bool AcceptsTab
        {
            get { return textBox.AcceptsTab; }
            set { textBox.AcceptsTab = value; }
        }
 
        public bool CanUndo
        {
            get { return textBox.CanUndo; }
        }
 
        public bool Focused
        {
            get { return textBox.Focused; }
        }
 
        public new IntPtr Handle
        {
            get { return textBox.Handle; }
        }
 
        public bool HideSelection
        {
            get { return textBox.HideSelection; }
            set { textBox.HideSelection = value; }
        }
 
        public int MaxLength
        {
            get { return textBox.MaxLength; }
            set { textBox.MaxLength = value; }
        }
 
        public bool Modified
        {
            get { return textBox.Modified; }
            set { textBox.Modified = value; }
        }
 
        public bool Multiline
        {
            get { return textBox.Multiline; }
            set { textBox.Multiline = value; }
        }
 
        public char PasswordChar
        {
            get { return textBox.PasswordChar; }
            set { textBox.PasswordChar = value; }
        }
 
        public bool ReadOnly
        {
            get { return textBox.ReadOnly; }
            set { textBox.ReadOnly = value; }
        }
 
        public override Color BackColor
        {
            get { return textBox.BackColor; }
            set { textBox.BackColor = value; }
        }
 
        public ScrollBars ScrollBars
        {
            get { return textBox.ScrollBars; }
            set { textBox.ScrollBars = value; }
        }
 
        public string SelectedText
        {
            get { return textBox.SelectedText; }
            set { textBox.SelectedText = value; }
        }
 
        public int SelectionLength
        {
            get { return textBox.SelectionLength; }
            set { textBox.SelectionLength = value; }
        }
 
        public int SelectionStart
        {
            get { return textBox.SelectionStart; }
            set { textBox.SelectionStart = value; }
        }
 
        public HorizontalAlignment TextAlign
        {
            get { return textBox.TextAlign; }
            set { textBox.TextAlign = value; }
        }
 
        public int TextLength
        {
            get { return textBox.TextLength; }
        }
 
        public bool WordWrap
        {
            get { return textBox.WordWrap; }
            set { textBox.WordWrap = value; }
        }
 
        #endregion
 
        #region Wrapped Methods
 
        public void ScrollToCaret()
        {
            textBox.ScrollToCaret();
        }
 
        public void Select(int start, int length)
        {
            textBox.Select(start, length);
        }
 
        public void SelectAll()
        {
            textBox.SelectAll();
        }
 
        public void Undo()
        {
            textBox.Undo();
        }
 
        #endregion
 
        #region Overridden Methods
 
        protected override void OnResize(EventArgs e)
        {
            base.OnResize(e);
            textBox.Bounds = new Rectangle(
                1,
                1,
                ClientSize.Width - 2,
                ClientSize.Height - 2);
            Height = textBox.Height + 2;
        }
 
        protected override void OnGotFocus(EventArgs e)
        {
            base.OnGotFocus(e);
            Invalidate();
 
            if (!EnabledCaret)
                HideCaret(Handle);
        }
 
        protected override void OnLostFocus(EventArgs e)
        {
            base.OnLostFocus(e);
            Invalidate();
 
            if (!EnabledCaret)
                ShowCaret(Handle);
        }
 
        protected override void OnPaint(PaintEventArgs e)
        {
            e.Graphics.Clear(textBox.Focused ? SystemColors.Highlight : Color.White);
        }
 
        protected override void OnPaintBackground(PaintEventArgs e)
        {
        }
 
        protected override void Dispose(bool disposing)
        {
            base.Dispose(disposing);
            textBox.Dispose();
        }
 
        #endregion
    }
}


Hope you find this useful. If you need the Visual Studio solution then you can grab it here.

Monday, October 19, 2009

How to hide the TextBox caret in .NETCF

I was trying to help a developer today in the smart device forums who wanted to hide the caret in the TextBox control. I started playing around with the Windows Mobile Platform SDK and I stumbled upon the methods HideCaret() and ShowCaret().

The outcome is this simple inherited TextBox control I decided to call TextBoxWithoutCaret :)

class TextBoxWithoutCaret : TextBox
{
    [DllImport("coredll.dll")]
    static extern bool HideCaret(IntPtr hwnd);
 
    [DllImport("coredll.dll")]
    static extern bool ShowCaret(IntPtr hwnd);
 
    protected override void OnGotFocus(EventArgs e)
    {
        base.OnGotFocus(e);
        HideCaret(Handle);
    }
 
    protected override void OnLostFocus(EventArgs e)
    {
        base.OnLostFocus(e);
        ShowCaret(Handle);
    }
}

Every time the TextBox control is focused I hide the caret and enable it again when focus is lost. This doesn't really make much practical sense and the only reason I do this is because HideCaret() is described to perform a cumulative operation meaning ShowCaret() must be called the same number of times HideCaret() was called for the caret to be visible again.

Sunday, October 18, 2009

Resizing an Image in .NETCF

I've seen some people ask how to resize an image or how to stretch an image in .NET Compact Framework in the community. Although the operation is pretty simple, I'll share a code snippet anyway.

public static Image Resize(Image image, Size size)
{
    Image bmp = new Bitmap(size.Width, size.Height);
    using (var g = Graphics.FromImage(bmp))
    {
        g.DrawImage(
            image,
            new Rectangle(0, 0, size.Width, size.Height),
            new Rectangle(0, 0, image.Width, image.Height),
            GraphicsUnit.Pixel);
    }
    return bmp;
}

What the code above does is to create a new image with the specified new size and draw the source image to fit the new image.

Friday, October 16, 2009

Improve .NETCF Build Performance in Visual Studio

A lot of .NETCF developers are surprisingly not aware of the Platform Verification Task in Visual Studio. Disabling this in the build process will speed up the build of .NETCF projects. To make things quick and short, here's what you need to do:

1) Open the file C:\WINDOWS\Microsoft.NET\Framework\v3.5\Microsoft.CompactFramework.Common.targets for editing.

2) Change the following:

   99   <Target
  100     Name="PlatformVerificationTask">
  101     <PlatformVerificationTask
  102       PlatformFamilyName="$(PlatformFamilyName)"
  103       PlatformID="$(PlatformID)"
  104       SourceAssembly="@(IntermediateAssembly)"
  105       ReferencePath="@(ReferencePath)"
  106       TreatWarningsAsErrors="$(TreatWarningsAsErrors)"
  107       PlatformVersion="$(TargetFrameworkVersion)"/>
  108   </Target>


to:

   99   <Target
  100     Name="PlatformVerificationTask">
  101     <PlatformVerificationTask
  102       Condition="'$(DoPlatformVerificationTask)'=='true'"
  103       PlatformFamilyName="$(PlatformFamilyName)"
  104       PlatformID="$(PlatformID)"
  105       SourceAssembly="@(IntermediateAssembly)"
  106       ReferencePath="@(ReferencePath)"
  107       TreatWarningsAsErrors="$(TreatWarningsAsErrors)"
  108       PlatformVersion="$(TargetFrameworkVersion)"/>
  109   </Target>


The following configuration above was an excert from an article called Platform Verification Task leading to slow builds on compact framework projects

Tuesday, October 13, 2009

Generic Singleton Implementation

Here's a helpful class that I've been using for implementing singleton objects through the years. This way I can use any class (as long as it has a default constructor) as a singleton object. Originally, I called this class the YetAnotherSingleton< T > but that was simply too unprofessional and I ended up renaming it.

public static class Singleton<T> where T : class, new()
{
    private static readonly object staticLock = new object();
    private static T instance;
 
    public static T GetInstance()
    {
        lock (staticLock)
        {
            if (instance == null)
                instance = new T();
            return instance;
        }
    }
 
    public static void Dispose()
    {
        if (instance == null)
            return;
        var disposable = instance as IDisposable;
        if (disposable != null)
            disposable.Dispose();
        instance = null;
    }
}

And here's an example of how to use the class above. To improve performance of web service calls its a good idea to use a singleton instance of the web service proxy class.

public static class ServiceClientFactory
{
    public static Service GetService()
    {
        var ws = Singleton<Service>.GetInstance();
        ws.Url = ConfigurationManager.AppSettings["ServiceUrl"];
        ws.Credentials = GetCredentials();
        return ws;
    }
 
    private static ICredentials GetCredentials()
    {
        var username = ConfigurationManager.AppSettings["ServiceUsername"];
        var password = ConfigurationManager.AppSettings["ServicePassword"];
        var domain = ConfigurationManager.AppSettings["ServiceDomain"];
        return new NetworkCredential(username, password, domain);
    }
}


In my next few articles I'll be sharing code from my design pattern framework that I've been using through the years.

Sunday, October 11, 2009

ListView Background Image in .NETCF

In this short entry I'd like to demonstrate how to display a background image in the ListView control. For this we will send the LVM_SETBKIMAGE or the LVM_GETBKIMAGE message to the ListView control with the LVBKIMAGE struct as the LPARAM. Unfortunately, the Windows CE version of LVBKIMAGE does not support LVBKIF_SOURCE_URL flag which allows using an image file on the file system for the background image of the ListView.

The layout of the background image can be either tiled or specified by an offset percentage. The background image is not affected by custom drawing, unless of course you decide to fill each sub item rectangle. For setting the background image we use the LVBKIF_SOURCE_HBITMAP flag together with the layout which is either LVBKIF_STYLE_TILE or LVBKIF_STYLE_NORMAL. If we set the layout to LVBKIF_STYLE_NORMAL, then we have the option of setting where the image will be drawn by setting the value of xOffsetPercentage and yOffsetPercentage.

In this example I'd like to make use of extension methods to add the SetBackgroundImage() and GetBackgroundImage() methods to ListView. This can of course be easily used to in a property to an inherited ListView.

public static class ListViewExtensions
{
    [DllImport("coredll")]
    static extern int SendMessage(IntPtr hWnd, int Msg, int wParam, ref LVBKIMAGE lParam);
 
    const int LVM_FIRST = 0x1000;
    const int LVM_SETBKIMAGE = (LVM_FIRST + 138);
    const int LVM_GETBKIMAGE = (LVM_FIRST + 139);
    const int LVBKIF_SOURCE_NONE = 0x00000000;
    const int LVBKIF_SOURCE_HBITMAP = 0x00000001;
    const int LVBKIF_STYLE_TILE = 0x00000010;
    const int LVBKIF_STYLE_NORMAL = 0x00000000;
 
    struct LVBKIMAGE
    {
        public int ulFlags;
        public IntPtr hbm;
        public IntPtr pszImage; // not supported
        public int cchImageMax;
        public int xOffsetPercent;
        public int yOffsetPercent;
    }
 
    public static void SetBackgroundImage(this ListView listView, Bitmap bitmap)
    {
        SetBackgroundImage(listView, bitmap, false);
    }
 
    public static void SetBackgroundImage(this ListView listView, Bitmap bitmap, bool tileLayout)
    {
        SetBackgroundImage(listView, bitmap, tileLayout, 0, 0);
    }
 
    public static void SetBackgroundImage(
        this ListView listView,
        Bitmap bitmap,
        bool tileLayout,
        int xOffsetPercent,
        int yOffsetPercent)
    {
        LVBKIMAGE lvBkImage = new LVBKIMAGE();
        if (bitmap == null)
            lvBkImage.ulFlags = LVBKIF_SOURCE_NONE;
        else
        {
            lvBkImage.ulFlags = LVBKIF_SOURCE_HBITMAP | (tileLayout ? LVBKIF_STYLE_TILE : LVBKIF_STYLE_NORMAL);
            lvBkImage.hbm = bitmap.GetHbitmap();
            lvBkImage.xOffsetPercent = xOffsetPercent;
            lvBkImage.yOffsetPercent = yOffsetPercent;
        }
 
        SendMessage(listView.Handle, LVM_SETBKIMAGE, 0, ref lvBkImage);
    }
 
    public static Bitmap GetBackgroundImage(this ListView listView)
    {
        LVBKIMAGE lvBkImage = new LVBKIMAGE();
        lvBkImage.ulFlags = LVBKIF_SOURCE_HBITMAP;
 
        SendMessage(listView.Handle, LVM_GETBKIMAGE, 0, ref lvBkImage);
 
        if (lvBkImage.hbm == IntPtr.Zero)
            return null;
        else
            return Bitmap.FromHbitmap(lvBkImage.hbm);
    }
}

Here's an example of exposing the background image as a property in an inherited ListView by using the extension methods above.

class ListViewEx : ListView
{
    public Bitmap BackgroundImage
    {
        get { return this.GetBackgroundImage(); }
        set { this.SetBackgroundImage(value, BackgroundLayout == BackgroundImageLayout.Tile); }
    }
 
    public BackgroundImageLayout BackgroundLayout { get; set; }
 
    public enum BackgroundImageLayout
    {
        Tile,
        Center
    }
}

A small catch with the ListView background image is that it is only supported in Windows CE 5.0 and later. Hope you found this information useful.

Thursday, October 8, 2009

ListView Custom Drawing in .NETCF

In this article I would like to demonstrate how to do custom drawing in the ListView control that the .NET Compact Framework provides. I'll be extending the code I published last year in the article entitled ListView Extended Styles in .NETCF

This is normally a very tedious and frustrating task to do and to accomplish this task we'll have to take advantage of the custom drawing service Windows CE provides for certain controls. A very good reference for custom drawing is an MSDN article called Customizing a Control's Appearance using Custom Draw. Before going any further, I may have to warn you about the extensive interop code involved in this task.

We'll have to handle the ListView windows messages ourselves, and we accomplish this by subclassing this ListView. Subclassing a window means that we assign a new window procedure for messages that are meant for the ListView. This can be done through the SetWindowLong() method with the GWL_WNDPROC parameter. When subclassing, the developer is responsible for choosing which messages they want to handle, which to ignore, and which they let operating system handle. To have the operating system handle the message, a call to CallWindowProc() is done using a pointer to original window procedure.

Before setting the new window procedure its important to get a pointer to the original one in case the developer wishes to let the operating system handle the message. This is done through GetWindowLong()

Let's get started...


First we need to define the interop structures for custom drawing

    struct RECT
    {
        public int left;
        public int top;
        public int right;
        public int bottom;
    }
 
    struct NMHDR
    {
        public IntPtr hwndFrom;
        public IntPtr idFrom;
        public int code;
    }
 
    struct NMCUSTOMDRAW
    {
        public NMHDR nmcd;
        public int dwDrawStage;
        public IntPtr hdc;
        public RECT rc;
        public int dwItemSpec;
        public int uItemState;
        public IntPtr lItemlParam;
    }
 
    struct NMLVCUSTOMDRAW
    {
        public NMCUSTOMDRAW nmcd;
        public int clrText;
        public int clrTextBk;
        public int iSubItem;
        public int dwItemType;
        public int clrFace;
        public int iIconEffect;
        public int iIconPhase;
        public int iPartId;
        public int iStateId;
        public RECT rcText;
        public uint uAlign;
    }

Note: In C# (and VB and C++), the StructLayout is Sequencial by default, hence I didn't state it


The P/Invoke declarations we need are the following:

    [DllImport("coredll.dll")]
    static extern IntPtr CallWindowProc(IntPtr lpPrevWndFunc, IntPtr hWnd, uint Msg, IntPtr wParam, IntPtr lParam);
 
    [DllImport("coredll")]
    static extern int SendMessage(IntPtr hWnd, int Msg, int wParam, ref RECT lParam);
 
    [DllImport("coredll.dll")]
    static extern uint SendMessage(IntPtr hwnd, uint msg, uint wparam, uint lparam);
 
    [DllImport("coredll.dll", SetLastError = true)]
    static extern int SetWindowLong(IntPtr hWnd, int nIndex, WndProcDelegate newProc);
 
    [DllImport("coredll.dll", SetLastError = true)]
    static extern IntPtr GetWindowLong(IntPtr hWnd, int nIndex);


And to make life a bit easier, I created some extension methods to the RECT struct we just defined.

    static class RectangleExtensions
    {
        public static Rectangle ToRectangle(this RECT rectangle)
        {
            return Rectangle.FromLTRB(rectangle.left, rectangle.top, rectangle.right, rectangle.bottom);
        }
 
        public static RectangleF ToRectangleF(this RECT rectangle)
        {
            return new RectangleF(rectangle.left, rectangle.top, rectangle.right, rectangle.bottom);
        }
    }


We'll need the following constants defined in the windows platform SDK

    const int GWL_WNDPROC = -4;
    const int WM_NOTIFY = 0x4E;
    const int NM_CUSTOMDRAW = (-12);
    const int CDRF_NOTIFYITEMDRAW = 0x00000020;
    const int CDRF_NOTIFYSUBITEMDRAW = CDRF_NOTIFYITEMDRAW;
    const int CDRF_NOTIFYPOSTPAINT = 0x00000010;
    const int CDRF_SKIPDEFAULT = 0x00000004;
    const int CDRF_DODEFAULT = 0x00000000;
    const int CDDS_PREPAINT = 0x00000001;
    const int CDDS_POSTPAINT = 0x00000002;
    const int CDDS_ITEM = 0x00010000;
    const int CDDS_ITEMPREPAINT = (CDDS_ITEM | CDDS_PREPAINT);
    const int CDDS_SUBITEM = 0x00020000;
    const int CDIS_SELECTED = 0x0001;
    const int LVM_GETSUBITEMRECT = (0x1000 + 56);


Custom drawing in the ListView will only work in the Details view mode. To ensure this, I set the View to View.Details in the constructor method. Since I'm extending my old ListViewEx (Enables ListView Extended Styles) I'm gonna enable Double buffering, Grid lines, and the Gradient background. I'm gonna enable subclassing on the ListView only when the parent is changed, this is because I need to receive messages sent to the parent control of the ListView. We also need a delegate for the new window procedure and a pointer to the original window procedure. And last but not the least we need the actual window procedure method.

    delegate IntPtr WndProcDelegate(IntPtr hWnd, uint msg, IntPtr wParam, IntPtr lParam);
    IntPtr lpPrevWndFunc;
 
    public ListViewCustomDraw()
    {
        View = View.Details;
        DoubleBuffering = true;
        GridLines = true;
        Gradient = true;
 
        ParentChanged += delegate
        {
            lpPrevWndFunc = GetWindowLong(Parent.Handle, GWL_WNDPROC);
            SetWindowLong(Parent.Handle, GWL_WNDPROC, WndProc);
        };
    }
 
    private IntPtr WndProc(IntPtr hWnd, uint msg, IntPtr wParam, IntPtr lParam)
    {
        if (msg == WM_NOTIFY)
        {
            var nmhdr = (NMHDR)Marshal.PtrToStructure(lParam, typeof(NMHDR));
            if (nmhdr.hwndFrom == Handle && nmhdr.code == NM_CUSTOMDRAW)
                return CustomDraw(hWnd, msg, wParam, lParam);
 
        }
 
        return CallWindowProc(lpPrevWndFunc, hWnd, msg, wParam, lParam);
    }

In the new window procedure, we are only really interested in the WM_NOTIFY message, because this is what the NM_CUSTOMDRAW message is sent through. The LPARAM parameter of the message will contain the NMHDR which then contains the NM_CUSTOMDRAW message. The LPARAM also contains the NMLVCUSTOMDRAW which provide state and information about the ListView.

The trickiest part in performing custom drawing in the ListView is handling the drawing stage. We create a method called CustomDraw to handle the different drawing stages of the ListView

    private IntPtr CustomDraw(IntPtr hWnd, uint msg, IntPtr wParam, IntPtr lParam)
    {
        int result;
        var nmlvcd = (NMLVCUSTOMDRAW)Marshal.PtrToStructure(lParam, typeof(NMLVCUSTOMDRAW));
        switch (nmlvcd.nmcd.dwDrawStage)
        {
            case CDDS_PREPAINT:
                result = CDRF_NOTIFYITEMDRAW;
                break;
 
            case CDDS_ITEMPREPAINT:
                var itemBounds = nmlvcd.nmcd.rc.ToRectangle();
                if ((nmlvcd.nmcd.uItemState & CDIS_SELECTED) != 0)
                {
                    using (var brush = new SolidBrush(SystemColors.Highlight))
                    using (var graphics = Graphics.FromHdc(nmlvcd.nmcd.hdc))
                        graphics.FillRectangle(brush, itemBounds);
                }
 
                result = CDRF_NOTIFYSUBITEMDRAW;
                break;
 
            case CDDS_SUBITEM | CDDS_ITEMPREPAINT:
                var index = nmlvcd.nmcd.dwItemSpec;
                var rect = new RECT();
                rect.top = nmlvcd.iSubItem;
                SendMessage(Handle, LVM_GETSUBITEMRECT, index, ref rect);
                rect.left += 2;
 
                Color textColor;
                if ((nmlvcd.nmcd.uItemState & CDIS_SELECTED) != 0)
                    textColor = SystemColors.HighlightText;
                else
                    textColor = SystemColors.ControlText;
 
                using (var brush = new SolidBrush(textColor))
                using (var graphics = Graphics.FromHdc(nmlvcd.nmcd.hdc))
                    graphics.DrawString(Items[index].SubItems[nmlvcd.iSubItem].Text,
                                        Font,
                                        brush,
                                        rect.ToRectangleF());
 
                result = CDRF_SKIPDEFAULT | CDRF_NOTIFYSUBITEMDRAW;
                break;
 
            default:
                result = CDRF_DODEFAULT;
                break;
        }
 
        return (IntPtr)result;
    }

In the first stage we handle is the CDDS_PREPAINT. Here we return CDRF_NOTIFYITEMDRAW to tell that we want to handle drawing of the row ourselves. After this we receive the CDDS_ITEMPREPAINT where we can draw the entire row.

We check if the row is selected through the uItemState field of NMCUSTOMDRAW, if this field has the CDIS_SELECTED flag then it means the item is selected, hence we draw a fill rectangle. After handling the CDDS_ITEMPREPAINT, we return CDRF_NOTIFYSUBITEMDRAW to tell that we want to draw the sub items ourselves.

For drawing the sub items we need to handle CDDS_SUBITEM | CDDS_ITEMPREPAINT. We can get the position index of the item through the dwItemSpec field of NMCUSTOMDRAW. To get the bounds of the current sub item we send the LVM_GETSUBITEMRECT message to the ListView and pass a pointer to RECT as the LPARAM. Before sending this message, set the "top" field of the RECT to the index of the sub item (retrieved from iSubItem field of NMLVCUSTOMDRAW. After drawing the sub item we return CDRF_SKIPDEFAULT | CDRF_NOTIFYSUBITEMDRAW to tell that we only care about handling the next sub item.

Well I hope you guys find this interesting and helpful. To keep things simple, I only demonstrated displaying plan text and a plain rectangle for the selection.

If you're interested in the full source code then you can grab it here.